- India:
 +91 9100090012
 - International:
 +91 9883305050


RPS CLOUDLAB SUPPORT
Get Support
You can count on our team of highly skilled customer experience service experts who take personal pride in giving top notch service to each and every customer.
Please note, we are able to respond much faster during our normal support hours of Monday to Friday 9am to 6pm IST,except Holidays. Emails received after 6 PM shall be addressed the following business day between 9am and 6pm IST. Kindly ensure to provide correct details as we have callback limitations.

Support Ticketing


Call

Test your Connection
https://support.goto.com/meeting/system-check
RPS Cloud Labs – User Guide
RPS Cloud Labs provides access to much of the functionality of a Admin Console from within your web browser. Although most people use remote desktop tools only when absolutely necessary, we believe that Console Access is a must for IT IMS training requirements, as the subscriber aims to become an Administrator, he will need all the flexibility of console access of server.
A learner can login to the RPS Cloud Labs by navigating to https://cloud.cdp.rpsconsulting.in/console/#/ URL using a recent Chrome or Mozilla browser, the console access is built using HTML5/Canvas Technology and does not require any plugins/activex or any java/.net runtimes.
Once you have successfully logged in, you will be taken to either the RPS Cloud Labs home screen, where all available connections are listed, or directly to a connection, if you only have access to one connection. The home screen will contain a list of all connections to which you have access, along with thumbnails of any recently used or active connections. If you have access to a large number of connections and wish to quickly locate a specific connection, you can also enter search terms within the "Filter" field to filter the list of connections by name.

The RPS Cloud Labs home screen. The user menu and several recently-used connections are visible, along with one active connection.
Clicking on any connection will open that connection within the current window or tab, but multiple connections can be used simultaneously. You can easily navigate back to the home screen without disconnecting by using your browsers back button or the "Home" button in the RPS Cloud Console menu. Each connection you use will remain active until explicitly disconnected, or until you navigate away from RPS Cloud Labs entirely. Active connections can be seen as thumbnails updating in real-time on the home screen.
With the exception of the client screen discussed below, all RPS Cloud Labs screens contain a menu in the upper-right corner called the "user menu". This menu displays your username and contains several options which depend on your user's level of access:
Home: Navigates back to the home screen, if you are not already there. If you only have access to one connection, this will be replaced with a link to that connection.
Settings: Navigates to the settings interface, which provides access to user preferences such as display language.
Logout: Logs out of RPS Cloud Labs completely, closing all current connections and ending the session.
Once you open a connection, you will see a real-time view of the remote display. You can interact with this display just as you would your normal desktop. Your mouse and keyboard will function as if they were connected directly to the remote machine.
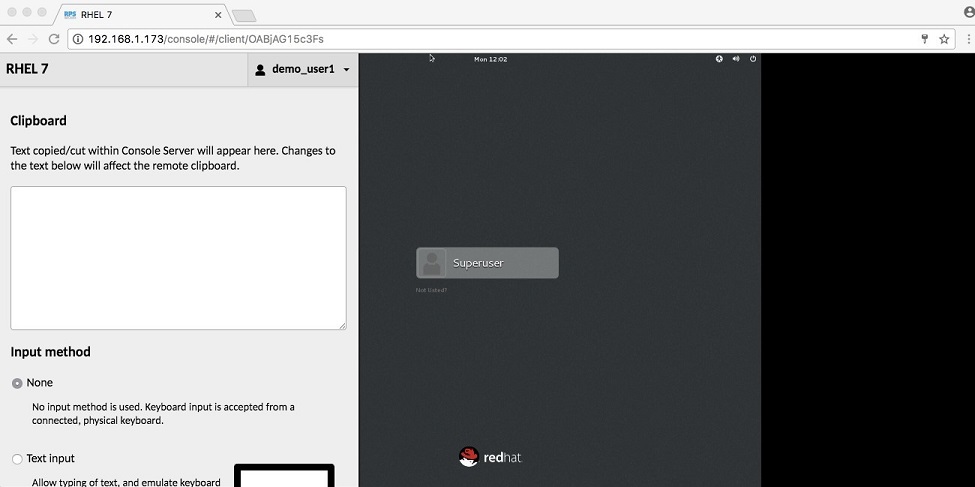
RPS Cloud Console interface, with the Console menu open.
The remote display will take up the entire browser window, with no buttons or menus to disturb the view. With the intent of providing a seamless experience, options specific to remote desktop are hidden within the RPS Cloud Console menu, which can be opened as needed.
The RPS Cloud Console menu is a sidebar which is hidden until explicitly shown. On a desktop or other device which has a hardware keyboard, you can show this menu by pressing Ctrl+Alt+Shift . If you are using a mobile or touchscreen device that lacks a keyboard, you can also show the menu by swiping right from the left edge of the screen. To hide the menu, you press Ctrl+Alt+Shift again or swipe left across the screen.
The Console menu provides options for:
- Navigating back to the home screen
- Reading from (and writing to) the clipboard of the remote desktop
- Selecting alternative methods of typing or controlling the mouse, particularly for use on mobile or touchscreen devices
- Zooming in and out of the remote display
- Disconnecting from the current connection entirely
At the top of the RPS Cloud Console menu is a text area labeled "clipboard" along with some basic instructions:
Text copied/cut within RPS Cloud Console will appear here. Changes to the text below will affect the remote clipboard.
The text area functions as an interface between the remote clipboard and the local clipboard. Text from the local clipboard can be pasted into the text area, causing that text to be sent to the clipboard of the remote desktop. Similarly, if you copy or cut text within the remote desktop, you will see that text within the text area, and can manually copy it into the local clipboard if desired.
When you are done using the current connection, or you wish to navigate elsewhere temporarily, options to do so are within the user menu inside the RPS Cloud Console menu:

The user menu within the RPS Cloud Console menu.
The user menu within the RPS Cloud Console menu provides an additional "Disconnect" option that allows you to explicitly close the current connection only. Clicking "Logout" will also implicitly disconnect all active connections, including the current connection.
Navigating back to the home screen or to the settings screen will not disconnect you: your connection will continue running in the background while you change settings or initiate another connection, and you can resume any active connection by clicking on it within the home screen.
Certain key combinations are impossible to press within a web application because they are reserved by the operating system (Ctrl+Alt+Del or Alt+Tab, for example) or by the web browser. If you press one of these reserved combinations, the effect will be observed locally, not remotely, and the remote desktop will receive only some of the keys.
RPS Cloud Console provides its own, built-in on-screen keyboard which allows keys to be sent to the remote desktop without affecting the local system. If the device you're using does not have certain keys which the remote desktop depends on, such as the arrow keys or Ctrl, you can use the on-screen keyboard for this, too. You can show the on-screen keyboard by selecting the "On-screen keyboard" option from the menu.
Clicking (or tapping) the buttons of the on-screen keyboard has the same effect as pressing the same buttons on a real keyboard, except that the operating system and browser will not intercept these keypresses; they will only be sent to the remote desktop.
RPS Cloud Console will default to shrinking or expanding the remote display to fit the browser window exactly, but this is not necessarily ideal. If the remote display is much larger than your local display, the screen may be impossible to see or interact with. This is especially true for mobile phones, whose screens need to be small enough to fit in the average hand.
You can scale the display on touch devices by using the familiar pinch gesture. Place two fingers on the screen and bring them closer together to zoom out or further apart to zoom in.
If your device lacks a touch screen, you can also control the zoom level through the menu. The controls for zooming in and out are located at the bottom of the menu. The current zoom level is displayed between two "-" and "+" buttons which control the zoom level in 10% increments.
RPS Cloud Console is designed to work equally well across all HTML5 browsers, including those of mobile devices. It will automatically handle input from a touch screen or a traditional mouse (or both, if you happen to have such a computer), and provides alternative input methods for devices which lack a physical keyboard.
Mouse emulation
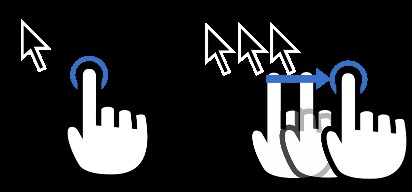
In the case that your device has a touchscreen and lacks a mouse, RPS Cloud Console will emulate a mouse for the sake of interacting with remote desktops that expect mouse input. By default, RPS Cloud Console uses "absolute" mouse emulation. This means that the mouse pointer is positioned at the location of each tap on the screen.
In both absolute and relative modes, you can click-and-drag by tapping the screen and then quickly placing your finger back down. This gesture only causes the mouse button to press down, but does not release it again until you lift your finger back up.
Absolute mode (touchscreen)
Absolute mouse emulation is the default as it tends to be what people expect when using a touch device to interact with applications designed for mouse input.
Each tap on the screen is translated into a left-click at that position. Right-clicking is accomplished through pressing and holding your finger on the screen. If parts of the remote display are off-screen, you can drag your finger around the screen to pan the off-screen parts back into view.
Although absolute mouse emulation works generally well, a finger makes for a very inaccurate pointing device. To address this, RPS Cloud Console also provides "relative" mouse emulation. Relative mouse emulation provides a way to deal with the need for accurate pointer control, when a true pointer device is not present.

Relative mode (touchpad)
RPS Cloud Console's relative mouse emulation behaves similarly to the touchpad present on most modern laptops. You drag your finger across the display to move the mouse pointer, and tap the display to left-click. The pointer moves relative to the motion of your finger. Right clicking is accomplished with a two-finger tap, and middle-clicking with a three-finger tap. The mouse scroll wheel can be operated by dragging two fingers up or down.
Because the relative mouse emulation reserves so many gestures for the different mouse buttons and actions, common touch gestures like panning and pinch-to-zoom will not work while relative mouse emulation is enabled. Instead, the screen will automatically pan to keep the mouse pointer in view, and you can zoom through the buttons in the menu.
Typing without a physical keyboard
Many mobile devices lack a physical keyboard entirely, and instead provide their own onscreen keyboards. As these are not true keyboards per se and do not produce key presses, RPS Cloud Console’s text input mode is required for typing on these platforms.
"Text input" allows input of keystrokes based on the input of text. Choosing "Text input" tells RPS Cloud Console to infer keystrokes by tracking text entered, rather than relying on actual key presses. RPS Cloud Console will instead determine the combination of keypresses necessary to produce the same pattern of input, including deletions.
If you wish to type via an IME (input method editor), such as those required for Chinese, Japanese, or Korean, text input mode is required for this as well. Such IMEs function through the explicit insertion of text and do not send traditional key presses. Using text input mode within RPS Cloud Console thus allows you to use a locally-installed IME, without requiring the IME to be installed on the remote desktop.
User preferences can be changed within the settings screen. These preferences are stored locally within the browser, so if you use multiple computers to access RPS Cloud Labs, you can have different settings for each location. The settings screen allows users to change the language of the RPS Cloud Labs Console interface, to change the default input method used by RPS Cloud Console connections, and to change the default mouse emulation mode for if a touch device is used. If you have sufficient permissions, you may also change your password, or administer the system.
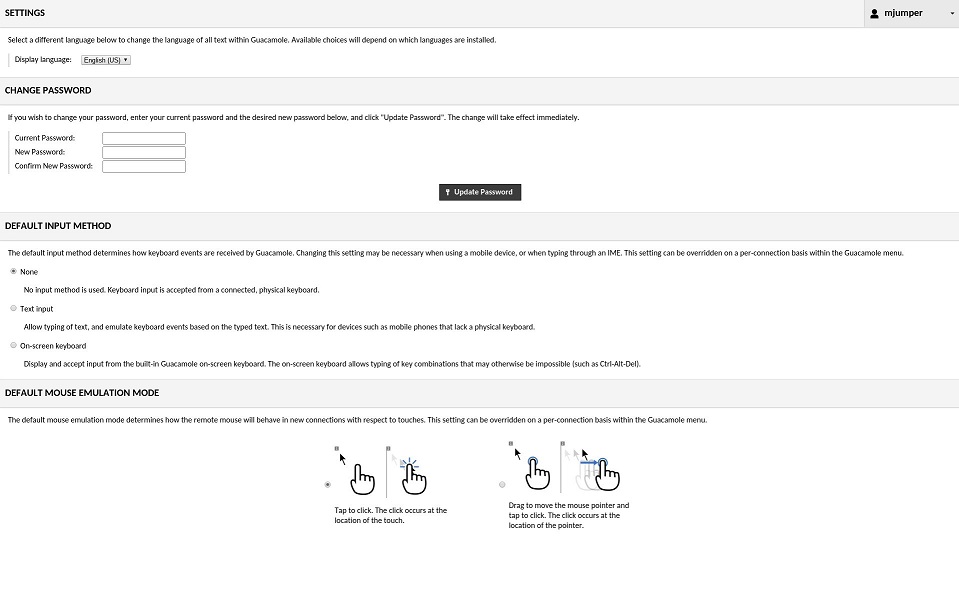
RPS Cloud Labs Console preferences screen.
Display language
The RPS Cloud Console interface is currently available in English, Dutch, French, German, Italian, and Russian. By default, RPS Cloud Console will attempt to determine the appropriate display language by checking the language preferences of the browser in use. If this fails, or the browser is using a language not yet available within RPS Cloud Labs, English will be used as a fallback.
If you wish to override the current display language, you can do so by selecting a different language within the "Display language" field. The change will take effect immediately.
Changing your password
System administrators can restrict the ability of individual users to change their own passwords, so this section may not always be available. If your account does have permission, the preferences screen will contain a "Change Password" section.
To change your password, you must provide your current password, enter the desired new password, and click "Update Password". You will remain logged in, and the change will affect any future login attempt.
Default input settings
RPS Cloud Console provides multiple keyboard input methods and multiple mouse emulation modes. Many of these settings are specifically useful for touch devices, while others are aimed mainly at traditional console use. By default, RPS Cloud Console will use the keyboard and mouse modes most commonly preferred by users, but you can change these defaults if they do not fit your tastes or your current device.
The choices available mirror those within the RPS Cloud Console menu discussed earlier in this chapter, and changing these settings will affect the default values selected within the RPS Cloud Console menu of future connections.